What is the learning purpose of your video?
The purpose of my learning video was how I make my ordinary tuna melt into something a bit more fancy! Tuna melts are a staple food item for myself since being a student as its easy, quick and quite cheap. Overtime I got slightly bored of the tuna and white bread combo so I experimented adding different ingredients and landed on something that I loved. The purpose of the video is to teach exactly how I add a lot of protein and flavour into a simple filling meal for students.
Which of the principles we’ve covered this term (e.g., Mayer/Universal Design for Learning/Cognitive Load Theory) did you incorporate into your design and why?
I focused on multiple principles while creating my video. These three principles below were the three main ideas that I noticed I was focusing on the most. I hoped that by incorporating these three principles the educational video would have the best results.
Segmenting Principle: From personal experience recipe/cooking videos can become long, overwhelming and includes unimportant information for something so simple. I focused on creating a short video with easy step by step clips in order to keep the viewers attention.
Personalization Principle: Using a conversational tone in my video in hopes of having the viewers feel as though they are engaged in a regular conversation instead of only listening to someone tell them what to do.
Coherence Principle: Focusing on only the topic of the video and not steering in other directions was a primary focus within my video. It is common that I get distracted while explaining step by step instructions so I found focusing on this principle was more for myself than viewers. However it also helps keep the viewer engaged in the video and give them the best possible outcome.
Accessibility: I did everything I could to make sure the video was accessible for everyone. I added captions and text for the step by step recipe. Focusing on descriptive audio and captions was one of my main priorities while capturing and editing the video.
What was challenging about capturing your own video?
I found it challenging to find angles that you could see everything I was doing very clearly. Overall the most challenging part was editing and presenting the video in a clear and simple way as I have never had any experience in creating a video like this. I had to learn how to edit the video so it was simple but also added in features that helped the viewer pay attention and not lose their attention. I think this became challenging due to my own challenges with being creative. These challenges involved a lot of time and effort. I had many drafts of different edits and spent time researching different ways to add text. I had to settle with having a watermark added to the video in order to add text as most editing apps require you to pay. In the future I would hopefully find a way where this would not occur but I do not think the watermark took away from the video.
My biggest problem was uploading the video, after many tries trying to upload to youtube I found it was easier to directly upload the video from my saved downloads on my computer. In the future I will spend more time uploading to youtube as youtube is a public media app that allows for more viewers to access the video than just the people with access to this blog.
What did you find easiest?
I found that the easiest part of this was creating the sandwich and keeping viewers intrigued in the content. Creating the tuna melt was easy as it is such a staple high protein meal I create often. I chose to make the video on something I have lots of experience in so that the video would have the most information possible for the best results and so that viewers following along felt confident in what I was doing. Keeping viewers intrigued was easy because I followed the three above principles I have mentioned. I did not want the video to be boring and have the learner lose their attention half way through so by using these above three principles I felt it was very easy to keep learners intrigued.
How would you approach capturing video differently next?
The most simple approach would be to ask for help! Something like cooking involves very different angles in order to see everything that is going on. I believe if I had asked for extra hands the video may have been easier for viewers to see all details within the video as well would have been easier for myself.
I think using my phone was perfectly fine for creating the video as technology has advanced so much the quality of sound and picture was great. Although I would spend more time beforehand creating a structured plan for capturing the video. Which clips will I record? Which clips do not matter as much? What order do I create the steps in? These are just a few questions I think I should have asked myself before capturing the final video.
Final Thoughts:
This was something I had never done and I have no experience in multimedia projects but I found that I was able to create an educational, detailed video that could help students when needing a high protein healthy and inexpensive meal. My goal was to focus on students as I have experience of living alone with a small budget and little time throughout the day. I hoped that this video would be educational and helpful for someone who may be in the same situation I once was.
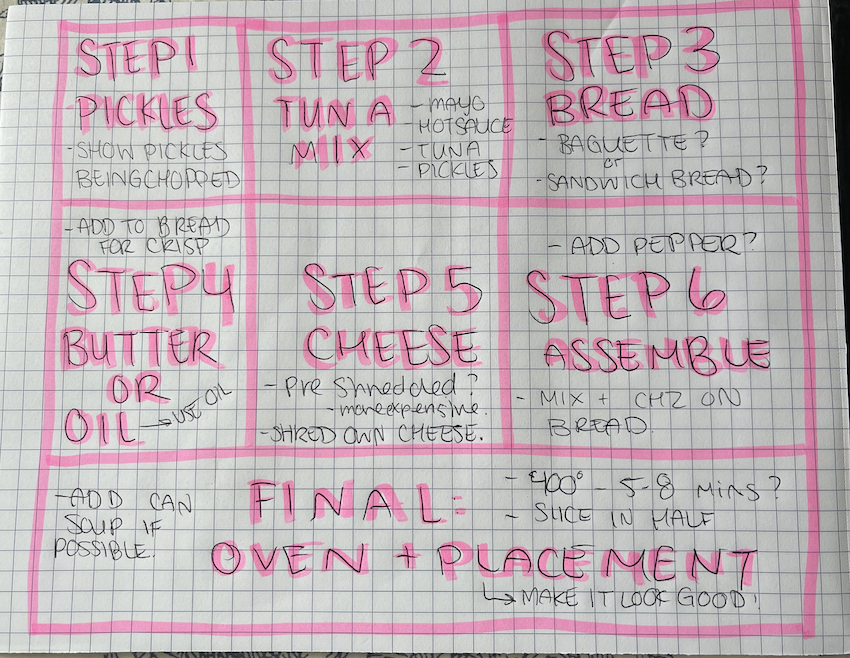
I have included a “storyboard” I made before I filmed that helped me organize step by step what I would need. You will notice notes that I made for myself about what bread to use, could I add soup to the side? This gave me structure before filming and helped in the final edits as well. I work well with colour and little notes which is clearly represented in my final storyboard.
Script:
- This video is a tuna melt tutorial
- You will start by turning the oven on to bake at 400 degrees
- We are using pickles so I am cutting up the pickles in half, just making them as tiny as possible so they are a bit more bite size. After I cut them in half I will cut them in half again so that they are a little bit smaller.
- This is the tuna I am using. It does have a chili oil added to it but that is not required. You can use any tuna you would like but this is the one I have chosen because I do like some spice.
- Once adding the tuna to a bowl I am adding as much mayo that I would like, the next step as well is optional I am adding sriracha to the mixture to again add a bit of heat.
- I am using a baguette and cutting it in half and then opening it up so I have two slices. Normal white bread is fine but this is what I have and I like the crunch it gives. I am also adding oil to the top. You can also use butter for this but again it just adds some crunch.
- For the topping I am using cheese so I am just shredding some cheese here. This is just a white aged cheddar cheese and it melts very well.
- After putting the tuna mixture on the bread I am adding the cheese on top. I am also making these open faces so the top gets crispy.
- Add the sandwich into the oven for 5-8 mins or until you can see the edges are nice and crisp!
- That’s the final! Thank you!
Leave a Reply
You must be logged in to post a comment.